Setting up DMX addresses is a crucial skill for any mobile DJ or anyone passionate about lightning. In fact, this is essential to create a proper light show thanks to a DMX controller.
How to set up your lights with a DMX controller:
- Determine the number of channels each light requires (see manuals)
- Put your lights in DMX mode
- Set the DMX address of each light so channels don’t overlap
- Save the DMX addresses in your DMX controller
What is a DMX address?
A DMX address is a DMX channel where your light starts synchronizing in the 512 channels available. By setting it up, the light will respond to any signal sent to this address.
It really is just like a postal address: This light lives at address “X”. Then the DMX controller can send information to the light thanks to its known address.*
Many lights nowadays will use several DMX channels. Therefore setting up this address corresponds to determine where you want this group of channels to be located in the full chain of 512 channels.

In this example, the Chauvet Swarm FX has 9 DMX channels. Its address was set to 5. Thus, the DMX controller knows that in order to access channel #4 of this light, it will need to go to its address (channel 5), and then add 3. Therefore, by changing the value of channel 8 of the entire DMX universe, channel 4 of the Chauvet Swarm FX is affected.
In short, setting up the DMX address is important to control properly a light thanks to a DMX controller. If not set properly, the controller will send instructions to the wrong channels and the lights will react differently from expected.
* In reality, this is the opposite, the address is for the light to know where to start reading the information sent from the controller. The controller sends information to all channels all the time. The light only needs to know what information is for itself and does that thanks to the address. But that’s easier to explain and picture the other way around.
DMX addresses and channels: understanding the difference.
In order to better apprehend DMX addressing and how to set up everything, I believe it is important to understand what a DMX channel is.
A DMX channel is a “canal” available in the 512 slots in what is called the DMX universe. Each channel can have a value between 0 and 255. These 256 values are electric signals that are created by a DMX controller and send to the fixtures to react.
Fixtures, such as lights, are programmed to react in a specific way for each value of a given channel. Taking the example of a simple unicolor dimmer, the value of the channel transcribes the intensity of the light. Therefore, 0 means no light whereas 255 means full intensity.
If you have a multicolored dimmer, one channel will define the intensity, the second the color, etc. The more channels a light has, the more control you can have over it. It all depends on how the manufacturer of the light programmed it. On complex lights, one channel value can correspond to a pattern sequence for instance.
On the popular Chauvet Swarm FX, there are 9 channels to control the fixture:

If I want to only light up the green laser with to rotation, I would need to send (explained in the user manual):
- Channel 1: 255 (DMX mode on)
- Channel 2 to 5: 0 (All leds in blackout)
- Channel 6: 50 (Green laser on)
- Channel 7: 0 (No strobe for laser)
- Channel 8: 0 (No leds anyway)
- Channel 9: 0 (Laser motor stopped)
Let’s retake my previous example with the Mini Kinta at address 1 and The Swarm FX at channel 5:

There the DMX controller send the information 0 / 0 / 0 / 0 / 255 / 0 / 0 / 0 / 0 / 50 / 0 / 0 / 0. The value 255 is send over the channel 5 of the entire DMX universe. But as the Chauvet Swarm address was set to 5, it knows that the channel 5 value is for its own channel 1. Thus, the Chauvet Swarm only reads 255 / 0 / 0 / 0 / 0 / 50 / 0 / 0 / 0.
Therefore with these values of channels, only the green laser of the Chauvet Swarm is lit.
In short, the DMX address purpose is to offset the reading of the DMX channels. The DMX channel values are what controls the light or fixture.
How to set up DMX addresses
1. Read your lights manual
In order to set up addresses and avoid channel overlaps, you need to know how many channels does your lights use. This can be found in the manual of your DMX fixtures.
2. Put your fixture in DMX mode
Some fixtures may need to be put in DMX mode. Otherwise, they won’t read the DMX values coming in their DMX in port. Some brands do that to make a clear distinction between sound-activated mode and DMX mode. Some others switch automatically to DMX if a DMX signal is received. So putting in DMX mode is not always necessary.
On many old gears, a dip switch value between 1 and 512 meant “DMX mode”. Other values, such as 0, would therefore mean sound-activated mode for instance. Other values may sometimes activate fixed patterns. Once again, it is important to read the manuals.
3. Set up addresses so that channels don’t overlap
Once you know how many channels each fixture use, set up the addresses so that channels don’t overlap. The order does not matter, what’s important is avoiding overlaps.
In the example below, the Chauvet Mini Kinta uses 4 channels and the Swarm FX 9:
I want to set the address of the Swarm FX in order to locate its group of channels. Channels 1 to 4 are already occupied by the Mini Kinta which has 4 channels and its DMX address set to 1. Therefore I set up the address of the Swarm FX to 5. Now the channels 1 to 13 are occupied. Any new light address should be set to something between 14 and 512.
3.1 How to define a DMX address with dip switches
On recent equipment, you will probably encounter a screen with a menu and navigation buttons. The address can therefore be set easily in the appropriate menu.
However on other equipment, and especially old ones, you may encounter dip switches to define the DMX address. A dip switch uses binary code to define an address. Instead of explaining binary, here is a conversion table:

All you have to do is adding together the switches that are on. In the example above the switches on are the 3, 5, and 8. Therefore the DMX address is 4 + 16 + 128 = 148!
There are also many apps for smartphones that would do the calculation for you.
4. Save the DMX address in your DMX controller.
There are many different DMX controllers, but they are all very similar. Here I take the example of the Chauvet Obey 40. It has 8 faders to modify 8 channel values at the same time.
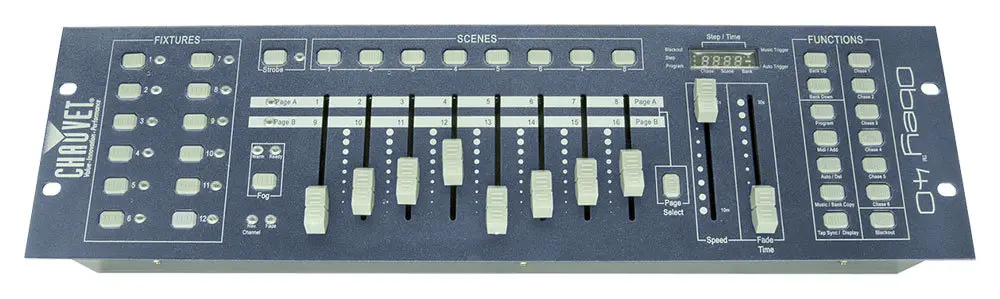
Without programming, the controller will send directly DMX values to channels according to the fixture button pressed. Here is the default correspondence table:

So if you press the button “Fixture 1”, the sliders/faders will change the values of channels 1 to 16. As you noticed, there are only 8 faders. But there is a page select button allowing you to control all 16 channels. Page A will be the 8 first channels and Page B the 8 last ones. Press the page button to switch between the two pages.
Therefore, if you don’t want to edit the controller to modify the addresses, you can modify the value on the lights instead, like so:
- First light: address 1
- Second light: address 17
- Third light: address 33
- etc.
This way, by simply clicking the appropriate “fixture” button, you control the appropriate light!
The table showed above is the default behavior of the fixture buttons and faders, but you can also edit them. For instance, you can decide that fixture 2 starts at address 5 instead of 17. For doing so, please refer to the user manual. Operations may differ between manufacturers.
The default addresses and behavior I showed in the table above are however true for many brands.
The new way to control by DMX
Please note it exists new interfaces to connect your DMX fixture to a laptop or tablet. These are way easier to use than the old school controllers because you can download fixture profiles and then having semi-automatic addressing. Otherwise, simply typing an address with a keyboard on a selected light also works!
These interfaces are also easier for programming light shows thanks to lean interfaces & controls. Popular options are:
- The SoundSwitch USB interface. Works with Windows and Mac. With the associated software (subscription), can sync with the DJ software Serato DJ & Virtual DJ. Also works with some DJ hardware such as the Denon Prime series. Be careful, from what I read, it only works with their software which works with a subscription fee.
- This USB to DMX interface. I honestly don’t know this specific one, but it works with the free “freestyler” software. I have a similar interface that also works with freestyler and I love it. This one has many great reviews on Amazon, so I guess it’s good.
- The American DJ Airstream. A wireless interface that you can control with a tablet. Expensive, but can help you reduce the length of your DMX cable thanks to a wireless dedicated wifi. Controlling your lights with a tablet is also very fun.
- The American DJ myDMX go. The most plug & play solution, select the light model in the list, and have fun! Compared to Airstream you cannot tweak everything. In short, it’s easier to use but less flexible. It also does not create its own wifi network as the Airstream does.
Can you give the same DMX address to two different lights?
You can give the same DMX address to two different lights. That’s what you do if you want identical lights to be in sync. As the two lights receive the same DMX instructions they behave identically.
Please note that all these instructions are valid only if everything is connected properly with DMX cables and eventually a DMX terminator. For more information on this topic, please follow this link: It is necessary to use DMX terminators?