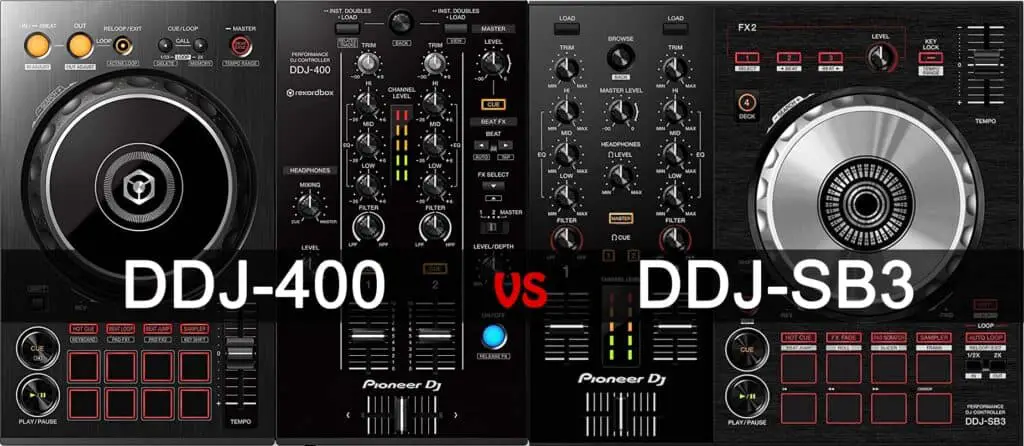
The DDJ-400 and DDJ-SB3 are among the most requested entry controllers from Pioneer. As they look very similar, knowing which to choose might be difficult for a beginner. The purpose of this review is to compare the controllers on every aspect to make a decision. So what are the differences between the Pioneer DDJ-400 vs the DDJ-SB3?
In connectivity, size, and audio quality, the DDJ-400 and DDJ-SB3 are identical. The main difference is the software: a complete Rekordbox for the DDJ-400 vs the lite version of Serato for the DDJ-SB3. As a key feature, the DDJ-400 has “key shift” whereas the SB3 has automatic scratch routines.
Of course, these are not all the differences there are between the two units. In this page, I will go in-depth on all aspects of the DDJ-400 and the DDJ-SB3. I will show where they are similar, where they differ and why choose one over the other.
DDJ-400 vs DDJ-SB3: All listed differences
The table below sums up all the differences between the DDJ-400 and the DDJ-SB3. The color code shows which controller has the upper hand on the other. Afterwards, I will describe in details each category in specific paragraphs. So if you don’t understand some of the terms in this table, keep reading!
| Pioneer DDJ-400 | Pioneer DDJ-SB3 | |
|---|---|---|
| Recording | Yes (free) | Paid option ($129). |
| Beat jump | Yes (free) | Paid option ($129). |
| Slicer | No | Paid option ($129). |
| Decks 3 & 4 control | No | Yes |
| Headphones CUE/master mix | Yes | No |
| Key shift | Yes | No |
| Key lock | No button but can be turned on with the computer. | Dedicated button. But analyzing the key is paid option*. |
| Pads beat loop | Yes | No |
| Pads scratch | No | Yes |
| Pads keyboard | Yes | No |
| Pads FX fade | Yes, included in Pad FX. | Yes |
| Pads trans | Yes, included in Pad FX. | Yes |
| Effects section | 1 on/off effect button, 1 “volume” knob. CDJs layout. | 3 on/off effect buttons, 1 “volume” knob. |
| Hot cues | 8 | 4, 8 by paid option*. |
| Loop roll | Yes, included in Pad FX. | Paid option ($129). |
| Sampler | 16 slots. | 4 slots, more with paid option*. |
| Effects pads mode | Yes, 16 direct effects + 16 additional with page 2. | Only fade effects = 8 direct effects |
| Slip mode | No button, but can be turned on with the computer. | Dedicated button but paid option*. |
| Software | Rekordbox | Serato DJ Lite |
| Pitch fader | Longer | Shorter |
| Dimensions W x H x D |
19 x 2.3 x 10.72 in | 19 x 2.3 x 10.72 in |
| Price | $249 (buy it on Amazon) | $249 (buy it on Amazon) |
* Paid option = Need to upgrade to Serato DJ Pro = a one-time fee of $129 or a subscription plan of $9.99 per month.
One can see the DDJ-SB3 has far more drawbacks than its brother the DDJ-400. This is mainly due to the fact the Pioneer DDJ-SB3 comes with Serato DJ Lite only. The latter comes with many limitations and because of that, many functions cannot be activated.
Some of them are greyed directly on the controller to warn you, such as the slicer, roll, beat jump, or slip mode. But not all the removed functions have this color notification. For instance, you cannot record your mix with Serato DJ Lite! I have written a very exhaustive post about the differences between Serato DJ Pro and Serato DJ Lite. If you are interested in this post: go have a look here.
With Serato DJ Pro, the Pioneer DDJ-SB3 can be considered almost on par with the DDJ-400 regarding functions. But in terms of cost, the DDJ-400 will then clearly be cheaper since Serato DJ Pro costs an additional $129! Indeed, the Pioneer DDJ-400 is full-featured out of the box: it comes with a license for the software.
If you consider using the SB3 with Serato DJ Pro, then the differences with the DDJ-400 can be cut down to these:
The Pioneer DDJ-400 has:
- A headphone CUE master mix
- The keyboard pads mode
- Key shift accessible on the pads
- Everything for only $249
The Pioneer DDJ-SB3 has:
- The slicer mode
- Controls over a third and fourth deck
- The pads scratch unique feature
- Everything for $249 + $129 = $378
Later in this post, I will go into details about these unique features such as the slicer, keyboard mode, pads scratch, etc. This should help you to decide if your decision is not made up to this point.
DDJ-400 vs DDJ-SB3: Dimensions and layout differences
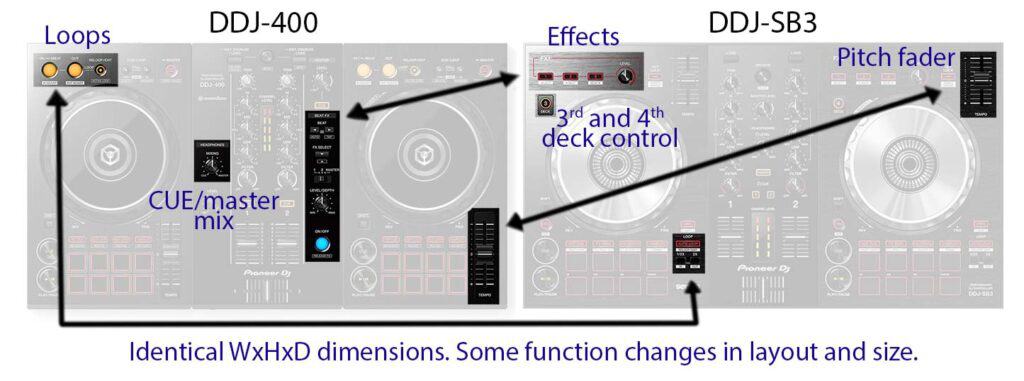
Here is an image comparing the two controllers at the same scale. The Pioneer DDJ-400 and DDJ-SB3 have the same dimensions of 19 x 2.3 x 10.72 in. The jog wheels also have the same size: around 5 inches.
The two units have however differences in the placement, layout, and size of some functionalities. This image lists them:
The main changes in layout are the looping sections, the effects, and the pitch fader length. The Pioneer DDJ-400 also has an additional knob for the headphone prelistening mix between a selected track (CUE) and the overall output (master). The Pioneer DDJ-SB3 has 2 additional buttons to activate the control of the 3rd and 4th deck.
The pads, which are located in the same area, are slightly smaller on the DDJ-400. These pads do not trigger the same functions on the two units, but I will explain the differences later in this post.
Now I am going to compare each of the sections in details.
DDJ-400 vs DDJ-SB3: Effects differences
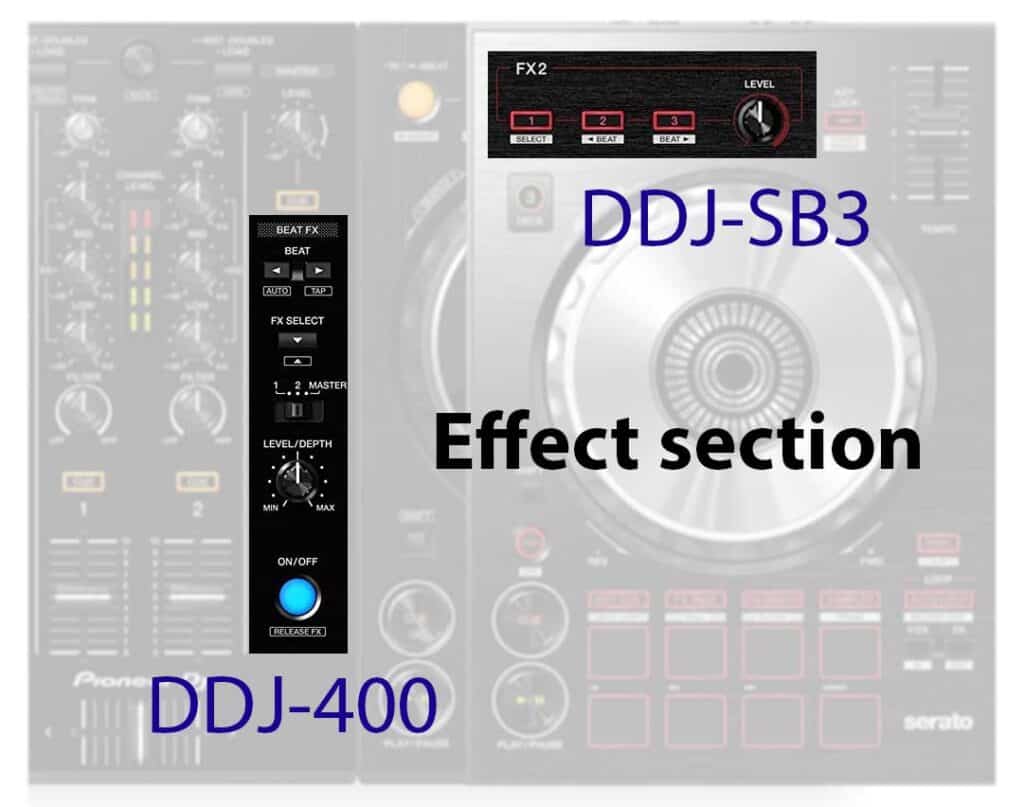
The biggest difference regarding the effects is that the DDJ-SB3 has one effect section per deck (called FX 1 & FX 2). The Pioneer DDJ-400 has only one effect section located in the mixer section (as most DJ mixers, especially the Pioneer DJMs).
The Pioneer DDJ-SB3 has 3 on/off buttons. In other words, you can trigger 3 effects at the same time. However, its “level” knob changes the volume of the 3 effects at the same time. By holding the shift button, you can change the length of the effects with the “beat” buttons. The “select” button – while pressing shift – will only change the type of effect on the 1st one. Unfortunately, there is no way to change the effects 2 and 3 other than with the mouse.
The Pioneer DDJ-400 has the very popular “DJM layout” such as the DJM-450 or DJM-900. As on these DJMs, the button can trigger only one effect at a time. That may seem lower than the DDJ-SB3, but on the other hand, the 400 has the pad effects on its 8 performance pads.
In other words, you can trigger 9 different effects per deck on the DDJ-400. The DDJ-400 also has a switch to select to which channel the effect applies: the left deck, the right deck, or both at the same time (1, 2, master).
The DDJ-400 has the “select” and “beats” buttons directly accessible without pressing the shift button. Compared to the SB3, having these dedicated buttons feels way more intuitive. In the heat of the moment, that’s less hassle for the brain. I really like the DJM layout because it is intuitive. Having the same layout on the DDJ-400 is really a big plus.
The Pioneer DDJ-400 can also trigger a “release FX”, by pressing the main button while holding the ‘shift’ button. A release effect is a kind of effect that you use to end a track such as “vinyl brake”, “backspin”, or “echo out”. It works by selecting beforehand one of these 3 effects in the Rekordbox software. Then it is available whenever you want on this button.
The DDJ-SB3 has similar effects called “FX fade” on one of the pads pages. Again, I prefer the DDJ-400 way of doing which feels more intuitive.
Effects winner: Pioneer DDJ-400
The DDJ-400 effect section is more intuitive than the DDJ-SB3. Moreover, it is very similar to what you will see in clubs on regular Pioneer DJM mixers. So it prepares you for what comes next. Having fewer “effects buttons” on the 400 is not really a drawback since the Pad FX1 & Pad FX2 totally make up for it (more details later).
DDJ-400 vs DDJ-SB3: Pads differences
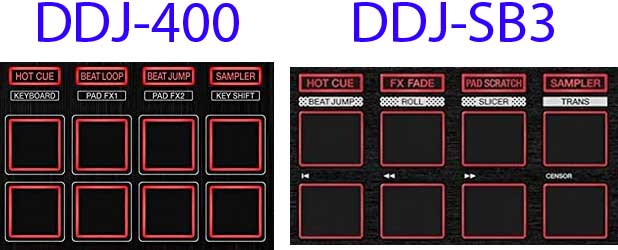
The pads on the DDJ-SB3 are slightly bigger than the ones on the DDJ-400. However, many of the pads’ functions on the SB3 are not unlocked with the delivered software Serato DJ Lite.
Indeed on the Pioneer DDJ-SB3, the beat jump, the roll, and the slicer are only available with Serato DJ Pro, which is a paid option. It’s $9.99 a month or a one-time fee of $129. These functions are “greyed out” on the controller, that’s how you make a distinction between the free and paid features.
Pads functions in common
- Hot Cues: To set several starting points or markers on your tracks.
- A sampler: To play short audio clips.
- ‘Trans’ & ‘FX Fade’ effect: Trans is a “gate-like” effect, and fade effects are specific effects to stop a song such as backspins, echo outs, advanced filters. ‘FX Fade’ effects are similar to the ‘release FX’ on Rekordbox.
Though it may seem that the Pioneer DDJ-400 does not have the Trans & FX Fade effect at first hand; they can be easily mapped on the Pad FX 1 & 2 pages. It does not require any technical skills to do so. Indeed Rekordbox proposes a very simple way to map it: Click on the pad on the software and chose from a list of effects. Really simple to do:
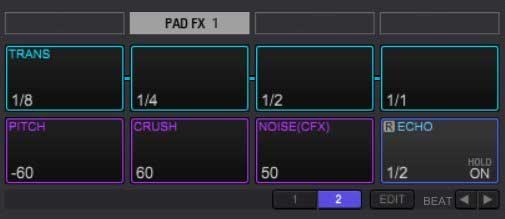
In this image, you can see that the DDJ-400 is more versatile when it comes to effects triggered by pads. More than that, each pad FX has a second page of effects that can be triggered using the shift button. That makes a total of 4 pages or 32 different effects!
You can map many different effects on the DDJ-400: Flanger, Phaser, Echos, Rolls, Delays, Filters, Trans, Pitch, Crush, Noise, Spiral, etc. On the DDJ-SB3, you are stuck with the Trans and FX fade effects. You cannot remap them easily as on Rekordbox. I love this Rekordbox feature which allows DJs to map their effects to their liking.
Regarding the beat jump and rolls: They are both available on the DDJ-400 and the DDJ-SB3. However, these are paid options on the latter. You won’t have them when you purchase the DDJ-SB3! On the other hand, you can map a complete page of “Pad FX” with rolls for free on the DDJ-400.
The remaining pad functions are the ones specific to each controller.
Pads functions specific to the Pioneer DDJ-400
- Keyboard mode: Play a cue point at different pitches.
- Key shift mode: Shift the pitch of the song by semitones.
About key shift
The key shift feature on the DDJ-400 is a killer feature. It is used to shift the key of a song by semitones. The key of a song is linked to the theory of music and translates the mood or feeling of a song. If a song is happy, sad, melancholic, loving, etc, it’s because of its key. When you hear “this song is in A minor” or “G major”, that’s what is called “the key”.
Having the possibility to change the key easily is important because songs that have incompatible keys will clash during a transition. It will sound bad. Therefore, shifting the keys to make them compatible is really cool. Before the invention of this feature, DJs had to be very selective in their song choices. The key shift gives DJs more flexibility in their song selection.
About the keyboard mode
The keyboard function is linked to the key shift one. It allows to take a short sample (in fact a hot cue) and shift its tone by semitones. This sample is mapped on all the pads and pressing them will play the sample but shifted in key. Therefore it will sound with lower and higher pitches, such as on a synthesizer.
For instance, if you take a piano sample, you can transform your controller into a piano. A string sample and your controller becomes a guitar! That’s why this feature is called “keyboard” because that’s what it is: a keyboard as on a synthesizer. It’s a very fun feature that will add a lot of creativity to your sets.
Pads functions specific to the Pioneer DDJ-SB3
- Pad scatch mode: Imitate scratch techniques by a button only.
- Slicer mode: Slice a 8 beat portion of your track into 8 short samples to play with while keeping rhythm with the ongoing track.
About pad scratch
In my opinion, the pad scratch feature is not that useful. It is a fun feature to fool your friends that you know how to scratch when you don’t, and that’s it… You will have fun for some weeks and then never use it. Indeed, as with any automated imitation, it does not work well all the time. So in the end your will probably want to learn to scratch properly instead.
The pad scratch feature is only a short introduction to scratching automated by software. If you would like to scratch the proper way, you can still use the jog wheel and the crossfader on both the DDJ-400 and DDJ-SB3. Here is a video showing how to do it on the Pioneer DDJ-400:
About the slicer mode
On the other hand, the slicer mode or also often called “beat slicer”, is very fun. It is very useful to create remixes on the fly as shown in a previous video.
It has two modes: The first one loops the same portion of a song over & over. You can therefore play any of the 8 “slices” of this portion with the pads.
It’s like having 8 hots cues evenly placed on that 8 beat loop but with the slip mode activated. What that means is that when you press a pad, it will play the sample but then get back to where the song was if you did not press the pad. It’s very clever because that feels more natural to the ear. Moreover, Serato will make sure everything stays in sync. Therefore you can jam the pads without having to worry about having proper rhythm.
The second mode is very similar to the first one. The only difference is that the 8 beat portion of the song moves with the song. In other words, it won’t loop the same portion again and again but different ones as time goes by.
The beat slicer may be one of the reasons to chose the Pioneer DDJ-SB3 instead of the DDJ-400.
Eventually, the pads functions of the DDJ-400 and DDJ-SB3 can be summed up like this:
Common on both controllers:
- Hot Cues
- A sampler
- Trans effect
- FX Fade effect
Available for free on the DDJ-400 but paid on the DDJ-SB3:
- Beat Jump
- Rolls
Available only on the Pioneer DDJ-400:
- Keyboard mode
- Key shift
- Pad FX
Available only on the Pioneer DDJ-SB3:
- Pad scratch
- Slicer mode
Pads winner: Pioneer DDJ-400
Though smaller than on the DDJ-SB3, the pads of the DDJ-400 have more variety of features. Moreover, they are more versatile due to Rekordbox easy mapping. Its “key shift” feature is also unmissable today, something the SB3 is lacking. One feature that does exist on the DDJ-SB3 that you may miss on the 400 is the beat slicer. Otherwise, the pad scratch of the SB3 is not a very useful function.
DDJ-400 vs DDJ-SB3: Pitch length
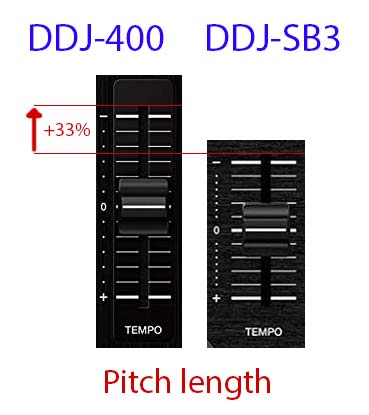
The Pioneer DDJ-400 pitch is 33% longer than the one on the DDJ-SB3 (image at scale). That gives the 400 way more accuracy when setting up the BPM for beatmatching. Really important in my opinion, I really struggle to set my BPMs on small controllers. However, that may not matter to you if you plan to use “sync” instead of manual beatmatching.
Pitch winner: Pioneer DDJ-400
DDJ-400 vs DDJ-SB3: 3rd and 4th deck control
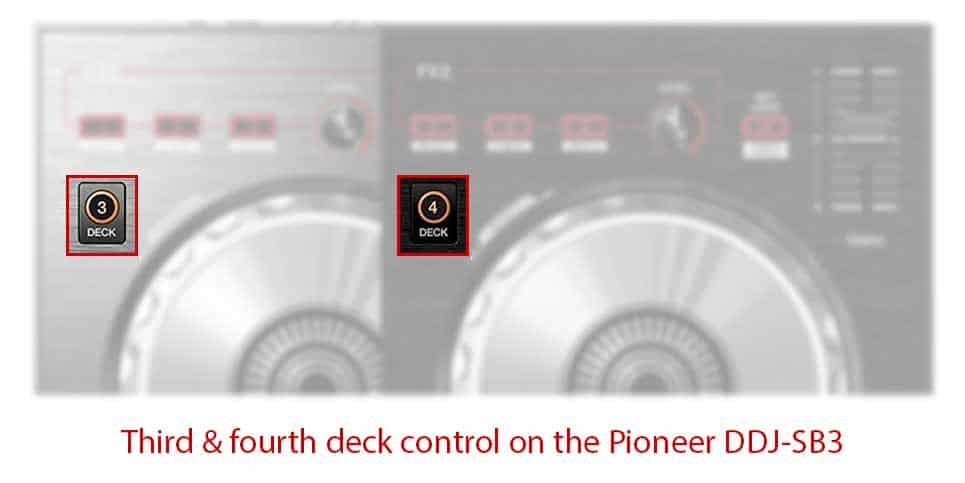
The Pioneer DDJ-SB3 has the possibility to control a 3rd and 4th deck. It’s a cool feature to play an acapella on top of your mix, create live mashups, etc.
In my opinion, such an option is better when you do have a dedicated 3rd and 4th channel in the mixer section. The DDJ-SB3 only has 2 channel faders and related equalizers (EQs). Therefore when you press an additional deck button, the existing fader & EQs switch from the previous deck (1 or 2) to the new one (3 or 4). In other words, you cannot change the volume of decks 2 and 4 at the same time for instance.
That’s why it is better to have 4 volume faders and related EQs with such button deck switchers (as on the DDJ-SX3). However, that’s still better than the DDJ-400 who does not propose these additional deck controls at all.
Having additional decks is a nice feature, but not compulsory for everyone. The basic of DJing is mixing two songs and for that the DDJ-400 would do a great job. Having additional decks depends on what your music style is. If you wanna be a hip-hop or scratch DJ and play acapellas then yes the 3rd & 4th decks may be interesting to you. In my case, I am a Trance DJ and I never use these decks.
Deck controls winner: Pioneer DDJ-SB3
The Pioneer DDJ-400 does not have a 3rd and 4th deck control out of the box. The DDJ-SB3 easily wins here.
DDJ-400 vs DDJ-SB3: Headphones pre-listening mix
The basics of DJing is to pre-listen with headphones what the crowd will hear next. Every DJ mixer allows selecting what you listen in the headphones thanks to CUE buttons. You can do that for every channel before putting the volume up and send it to the speakers.
The Pioneer DDJ-400 has a knob to change the mix balance between the CUE (a channel) and the master (what is played through the speakers). If turned left, you listened to the selected channel (CUE). If turned right, you hear only what the crowd hears. At the middle point, you hear both equally.
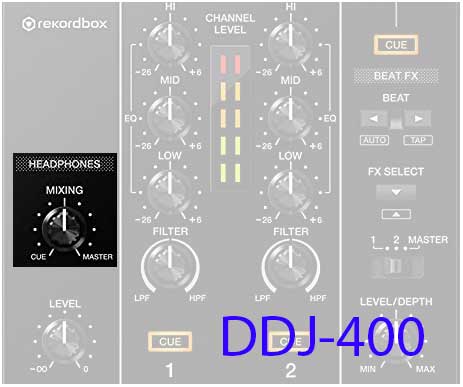
This feature allows to beatmatch more easily. You can change what you listen quickly by just turning the knob according to the situation. On the DDJ-SB3, you will need to remove a CUE and press another one, which means doing 2 steps instead of 1.
Another useful situation is when the speakers are very loud (i.e. in a club). In this case, you would prefer to beatmatch with the knob at 9 o’clock instead of a regular 12 o’clock position. That would be the only way to hear the sound evenly in the headphones. Indeed, the sound of the speakers is added to the ones in your headphones. To compensate you can lower the master in the headphones by turning the knob to the left. You cannot do that with the DDJ-SB3.
Headphones mix winner: Pioneer DDJ-400
The Pioneer has a knob to balance between the CUE & master in your headphones. It is a regular feature found on every DJ mixer and DJ controller. This is really strange the DDJ-SB3 does not have this feature which is very important.
DDJ-400 vs DDJ-SB3: Loops differences
The looping section of the Pioneer DDJ-SB3 and DDJ-400 are very similar though more accessible on the DDJ-400 thanks to additional buttons. Therefore, for loops, the Pioneer DDJ-400 is more intuitive.
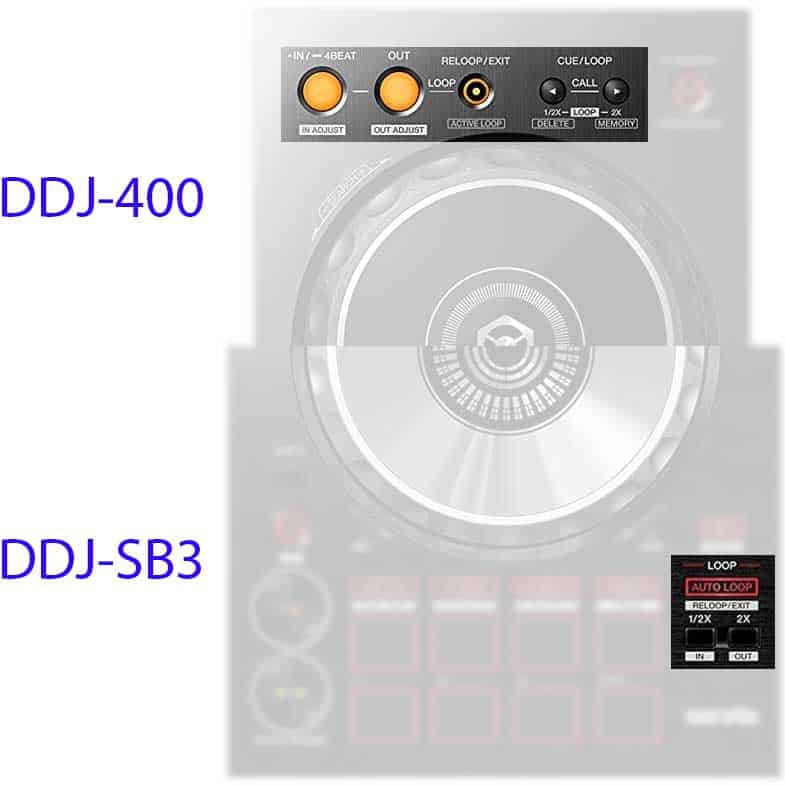
Loops functionalities on both the DDJ-400 and DDJ-SB3:
- Auto-loop
- IN & OUT points
- IN & OUT adjustments while playing
- Cut the loop length in half (1/2X)
- Multiply the loop length by two (2X)
Where the DDJ-SB3 differs is that setting IN & OUT points manually requires pressing the shift button beforehand. Therefore it is not possible to create easily a loop on the fly with only one hand. That may not seem much, but when you have an inspiration for a loop, you don’t wanna miss the starting point.
Loops winner: Pioneer DDJ-400
The Pioneer DDJ-400 is more intuitive for setting loops. It allows you to set loop points on the fly with only one hand. It’s really important because it breaks the barrier between an idea and really performing it without delay.
In fact, the DDJ-400 is using a road-tested layout used on CDJs for years. This is a huge advantage if you plan to mix in a club. Indeed, every CDJs have this layout, so you will be used to it. The DDJ-400 is a very good way to train before going big!
DDJ-400 vs DDJ-SB3: Connectivity
The Pioneer DDJ-SB3 and DDJ-400 have the same inputs and outputs:
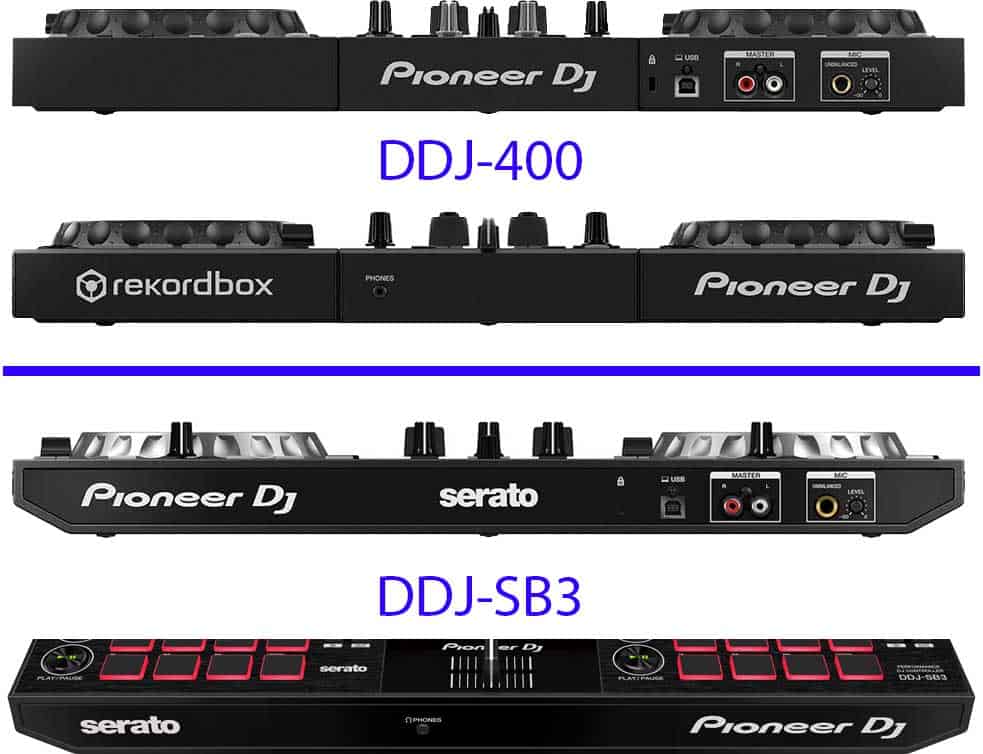
Connectivity: The DDJ-SB3 and DDJ-400 have:
- One USB port: To connect to the computer you want to control.
- A master RCA output: To connect to speakers or an amplifier.
- A 1/4″ mic input: To connect a dynamic microphone (no condenser mics!).
- A 1/4″ headphone output: To pre-listen to your mix before sending the sound to the speakers.
Connectivity: Tie
The two controllers have the same inputs and outputs: A USB port, an RCA output, a 1/4″ mic input, and a 1/8″ headphones output (3.5 mm jack).
DDJ-400 vs DDJ-SB3: Audio quality differences
The Pioneer DDJ-400 and DDJ-SB3 have the same audio quality. This is no surprise since the two controllers come from the same manufacturer, have the same price range, and have identical audio specs:
- Soundcard: 24 bits / 44.1 kHZ
- Frequency Range: 20 to 20000 Hz
- Signal to noise ratio: 103 dB
- Distortion: < 0.005%
Audio quality: Tie
There is no difference in audio quality between the DDJ-400 and the DDJ-SB3.
DDJ-400 vs DDJ-SB3: Rekordbox vs Serato
The Pioneer DDJ-400 comes with a license for the pro version of Rekordbox. Rekordbox is a software from Pioneer made for both track preparation and mixing. The track preparation side is important because that’s the one you will need to export your tracks CUEs, loops, and grids for CDJs.
CDJs are the most common piece of DJ equipment. Every clubs have them, it’s the standard. What it implies is that everything you prepare in Rekordbox for the DDJ-400 will also be ready for the CDJs from Pioneer. That’s a huge advantage for the DDJ-400. Indeed, every DJ needs to use Rekordbox at one time in their career. Even people using the DDJ-SB3 with Serato would need to download Rekordbox to play in a club.
The Pioneer DDJ-SB3 comes with Serato DJ Lite, a diminished version of its big brother Serato DJ Pro. That’s why many of the DDJ-SB3 features are not available out of the box: you need to buy the Pro version to unlock them. The cost is either a one-time fee of $129 or a monthly subscription of $9.99.

Then, if I had to compare Serato DJ Pro with Rekordbox I would say that:
Serato is a more plug-and-play software. Its advantage is to have very few options or tweaking parameters. If you want a hassle-free experience without having to worry about parameters, Serato is the software to chose. You can compare it to the experience Apple gives to its users: It just works.
Rekordbox is also plug-and-play allows to change many parameters from the options menu. It’s not compulsory to go in the options but that’s a possibility if needed. If you want an experience more tailored for your specific needs then Rekordbox is best for you. Personally, I feel like Pioneer did not get too far into the number of parameters.
Indeed, it is still easy to handle compared to Traktor – another DJ software – where everything is personalizable. But Traktor went to a point where you get lost and sometimes don’t understand why something fails. I don’t feel this way with Rekordbox.

In terms of functionalities, Serato and Rekordbox offer the same deal. So in the end it’s really about the experience you want to have: personalization with Rekordbox or hassle-free experience with Serato.
I recommend looking at the video below. It really catches in only 6 minutes the few differences and the targeted users. It also allows you to see what they look like in action:
Software winner: Pioneer DDJ-400
The Pioneer DDJ-400 comes with all its functions unlocked with Rekordbox. On the other hand, the DDJ-SB3 only comes with the lite version of Serato DJ. Because of that many features of the SB3 are locked which is a shame.
Moreover, Rekordbox has the big advantage to allow the export of all your grids, CUE points, and loops to a USB drive. Your USB key can then be used on every CDJs for a plug-and-play experience on club equipment. Preparing with a DDJ-400 means being ready for the club experience!
Why chose the Pioneer DDJ-400 over the DDJ-SB3?
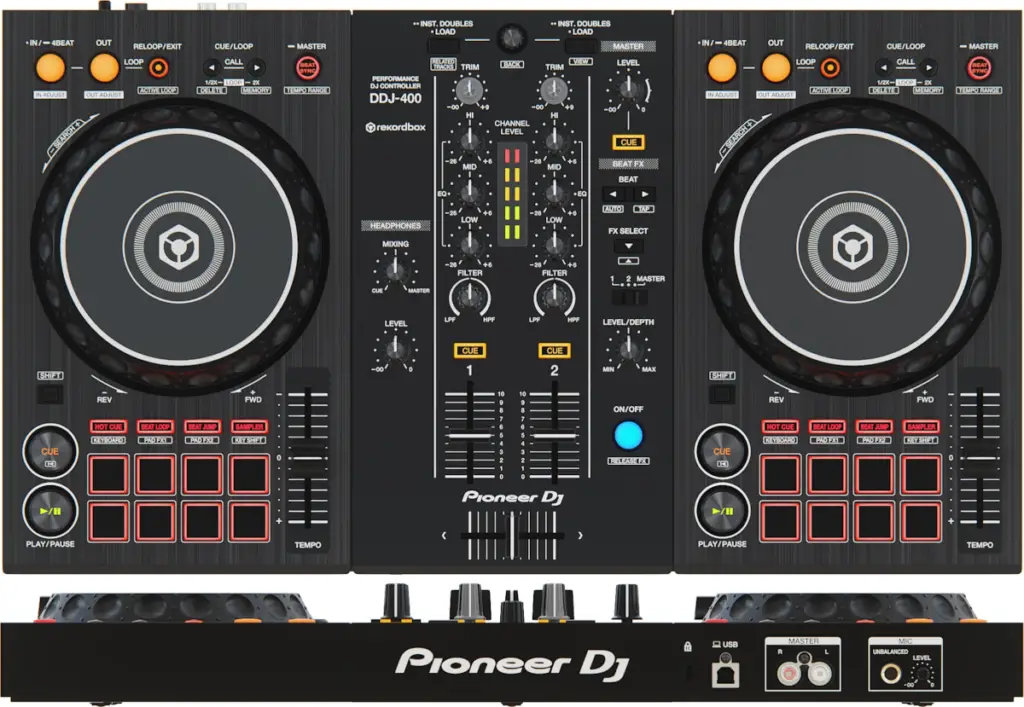
The DDJ-400 is the best for value DJ controller:
- Everything is unlocked out of the box without the need to purchase an additional license.
- It is more versatile with the possibility to map the pads in many ways to fit your needs.
- It has a layout similar to the CDJs that all clubs and festivals are equipped with. Meaning it is the best way to practice at home.
- It comes with Rekordbox, a software that you will need to use the day you switch to CDJs. So if you play in a club one day, all the cues and loops you will have prepared with the DDJ-400 will work with the club equipment.
- Overall, the placement of the buttons is more intuitive making it a better instrument for your creativity.
- The key shift is a killer function that you don’t want to miss.
Why chose the Pioneer DDJ-SB3 over the DDJ-400?
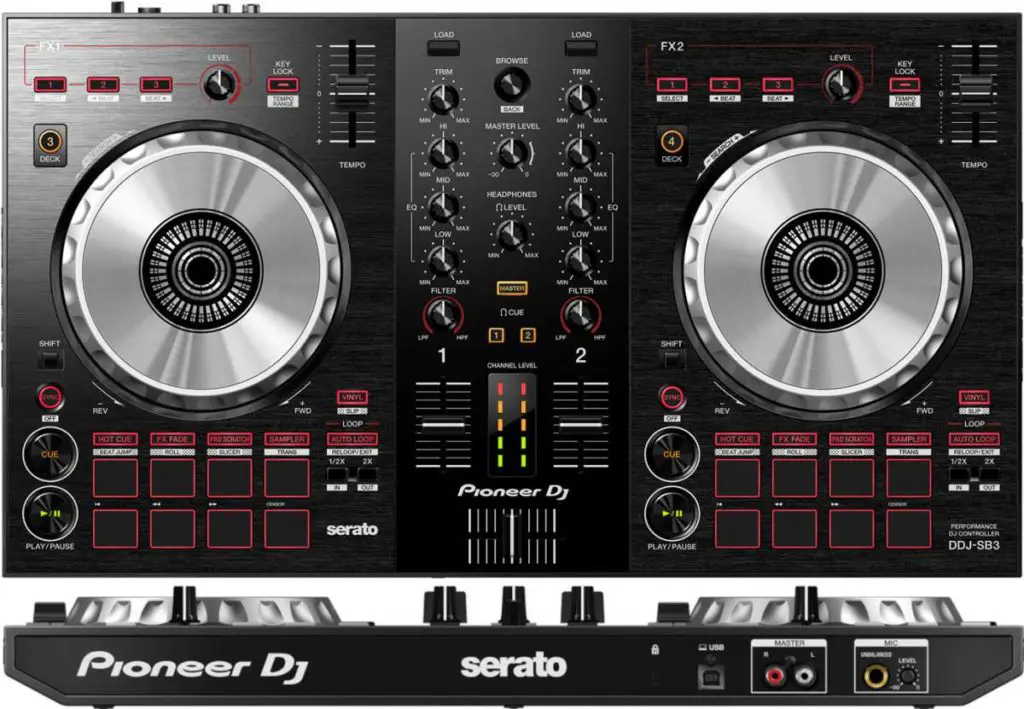
The DDJ-SB3 is more aimed at future turntablists / hip-hop DJs / scratching:
- A fun pad scratch feature to introduce you to scratching.
- A 3rd and 4th deck control to be able to play 4 tracks at the same time. Very useful to play acapellas or scratch over two beatmatched songs.
- The slicer, which enables you to do live remixes on the fly. Very creative for your DJ routines.
- Comes with Serato DJ, a loved software in the turntablist culture.
Just be aware that some functions, such as the slicer, need an additional license for Serato DJ Pro. It comes at a one-time fee of $129 or a monthly subscription of $9.99. For a complete comparison between Serato DJ Lite and Serato DJ Pro, follow this link.
Overall winner: Pioneer DDJ-400
The Pioneer DDJ-400 gives more out of the box. It has more functionalities and is more versatile. It is also more intuitive thanks to a well-thought layout. What’s best is that it prepares you for the future: clubs and their CDJs. All that made possible thanks to a tight synergy between hardware and software.
Even though the SB3 main target is turntablists, the DDJ-400 is a great controller for scratching as well. In other words, there is no doubt to have: the Pioneer DDJ-400 is a better controller than the DDJ-SB3.
